


오늘은 AOP와 관련한 내용을 다루고자 한다. 순서는 AOP를 도입해야겠다고 생각한 계기, AOP란 무엇인지 그리고 간단한 실습을 통해 AOP의 2%를 맛볼 예정이다.
왜 AOP를 도입!?
작년 대외활동에서 진행한 프로젝트에 대해 자체적으로 코드리뷰를 수행하고 있다. 그런데, 각 기능을 수행하기 전 JWT 보안 인증을 거치는 중복 코드가 존재했다. 좀 더 자세하게 그림으로 설명하겠다.
위 그림을 참고해보면 게시글 작성, 조회, 삭제할 때 사용자 검증을 위한 사전 작업이 필요하다는 것을 확인할 수 있다. 물론, 이렇게 개발을 진행해도 크게 문제될 것은 없다. 그러나 요즘 clean code가 트랜드 아니겠는가!?
그래서 현재 프로젝트 구조에서 어떻게 하면 가독성 좋은 깔끔한 구조가 될지 고민하게 되었다. 만약, 사용자 검증을 분리한다면 어떻게 될까??
위 그림과 같은 형태가 될 것이다. 현재 프로젝트 구조와 비교해보면 확실한 차이를 느낄 수 있다. 코드를 보지않고 구조만 보았는데도 벌써 깔끔해졌다. 이처럼 중복되는 기능을 한번 더 분리하는 작업에 대해 알아보던 중 AOP라는 개념에 대해 알게되었고 도입해보자고 다짐하게 되었다.
그래서 AOP가 무엇인가요..?
위키 백과를 참고해보면 "AOP란 Aspect Oriented Programming의 약자로 관점 지향 프로그래밍이라고 불린다. 관점 지향은 어떤 로직을 기준으로 핵심적인 관점, 부가적인 관점으로 나누어서 보고 그 관점을 기준으로 모듈화 하겠다는 것이다." 라고 설명되어 있다.
사실 이 말이 처음에는 이해가 가지 않았다. 그래서 아래 그림을 바탕으로 간단하게 설명해보고자 한다.
위 그림과 같이 객체지향 프로그래밍을 하다보면 보안적인 측면이나 로그를 남기는 등의 중복 작업이 발생할 수 있다. 그래서 공통되는 부분을 한번 더 묶어서 프로그래밍 하는 것을 AOP라고 하는 것이다.
다시 나의 프로젝트 구조를 살펴보면
사용자 검증을 하는 보안적인 측면에서 중복이 발생하는 것을 확인할 수 있다. 그래서 이것들을 묶어 하나의 모듈(측면)으로 본다면 AOP를 적용한 예시가 될 것이다.
말보다는 행동이다. 실습을 통해 AOP의 2%를 이해해보자!!
AOP 초간단 실습
위 그림과 같은 예제를 통해 초간단 실습을 진행해보자!!
1. 프로젝트 생성
해당 웹사이트에 접속하여 Spring Web과 Lombok을 추가해서 프로젝트를 생성하면 된다.
2. AOP 적용 X
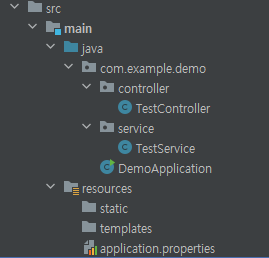
AOP를 적용하지 않고 우선 코드를 작성해보자.
구조
application.properties
token.test=kingmjcontroller > TestController
package com.example.demo.controller;

import com.example.demo.service.TestService;
import org.springframework.http.HttpStatus;
import org.springframework.http.ResponseEntity;
import org.springframework.web.bind.annotation.GetMapping;
import org.springframework.web.bind.annotation.PostMapping;
import org.springframework.web.bind.annotation.RequestHeader;
import org.springframework.web.bind.annotation.RestController;

@RestController
public class TestController {
    private final TestService testService;
    public TestController(TestService testService){
        this.testService=testService;
    }
    @GetMapping("/community")
    public ResponseEntity<String> getPoster(@RequestHeader(name="Authorization") String token){
        return ResponseEntity.status(HttpStatus.OK)
                .body(testService.getPoster(token));
    }
    @PostMapping("/community")
    public ResponseEntity<String> writePoster(@RequestHeader(name="Authorization") String token){
        return ResponseEntity.status(HttpStatus.OK)
                .body(testService.writePoster(token));
    }
}
service > TestService
package com.example.demo.service;

import org.apache.tomcat.websocket.AuthenticationException;
import org.springframework.beans.factory.annotation.Value;
import org.springframework.stereotype.Service;

@Service
public class TestService {
    @Value("${token.test}")
    private String serverToken;
    public String getPoster(String token){
        // 1. 사용자 인증 코드
        if(!token.equals(serverToken)){
            return "인증에 실패했습니다.";
        }
        // 2. 불러오는 로직 => 있다고 가정

        // 3. 인증에 성공한 경우 성공 메시지 출력
        return "get 요청에 성공했습니다.";
    }
    public String writePoster(String token){
        // 1. 사용자 인증 코드
        if(!token.equals(serverToken)){
            return "인증에 실패했습니다.";
        }
        // 2. 작성하는 로직 => 있다고 가정

        // 3. 인증에 성공한 경우 성공 메시지 출력
        return "post 요청 성공";
    }
}
결과
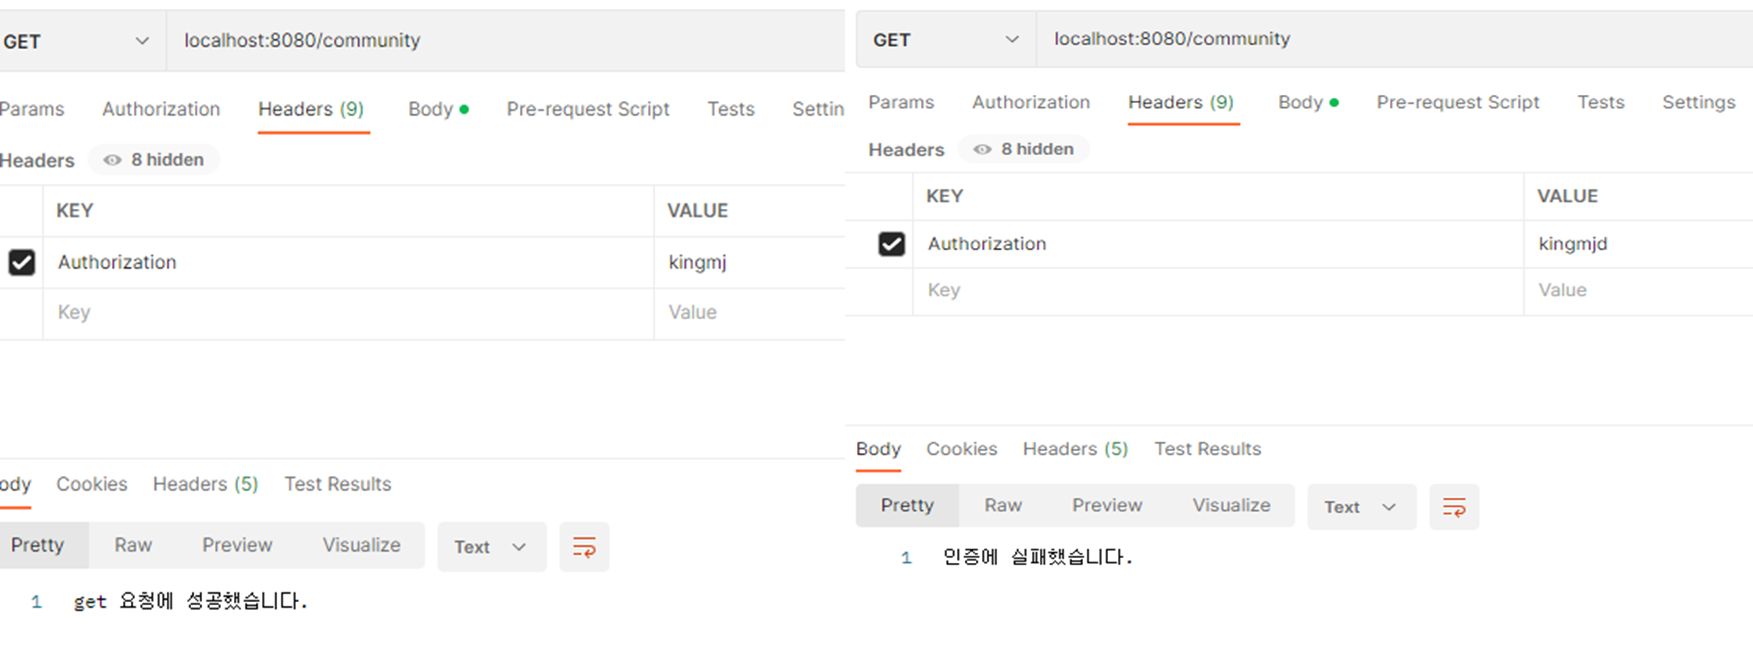
성공적으로 로직을 작성했다. 그러나 한 가지 해결해야할 문제가 있다.
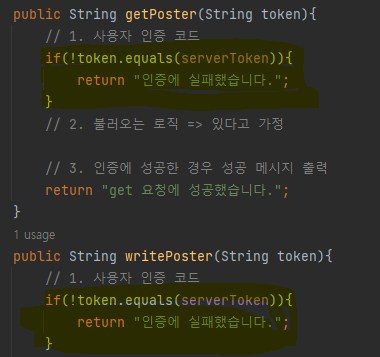
위 사진을 참고해보면 사용자 인증 부분에서 중복되는 코드가 발생하는 것을 확인할 수 있다. 물론 이렇게 간단한 작업의 service 내에서 함수로 만들어 중복을 최소화할 수 있다. 하지만, 이번에는 AOP에 관련한 주제를 다루고 있기 때문에 AOP를 적용해보고자 한다.
3. AOP 적용 O
사용자 인증 부분 즉, 보안적인 측면에서 중복 코드가 발생했다. 그래서 이것을 AOP로 작성해보자.
참고로 위에서 작성한 코드와 Exception Handler, Custom Annotation을 기반으로 작성한다. (다소 어려울 수 있음 ㅜㅜ)
필수 지식
| @Aspect | AOP로 정의하는 클래스를 지정한다. |
| @Pointcut | AOP기능을 메소드, Annotation 등 어디에 적용시킬지 지점을 설정한다. |
| @Before | 특정 작업을 실행하기 이전에 반드시 수행한다. (메소드, annotation 지정 가능) |
| @After | 특정 작업을 실행한 후에 반드시 수행한다. (메소드, annotation 지정 가능) |
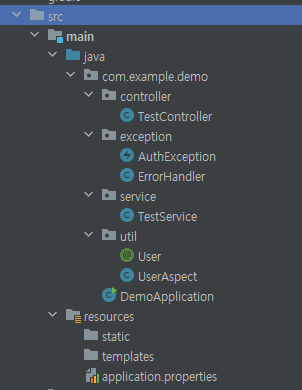
구조
코드 설명에 앞서 반드시 설정해주어야 하는 것이 있다. 아래의 내용을 참고하여 따라하면 된다.
build.gradle
implementation 'org.springframework.boot:spring-boot-starter-aop'위 옵션을 추가하면 끄읕~
DemoApplication
package com.example.demo;

import org.springframework.boot.SpringApplication;
import org.springframework.boot.autoconfigure.SpringBootApplication;
import org.springframework.context.annotation.EnableAspectJAutoProxy;

@SpringBootApplication
@EnableAspectJAutoProxy
public class DemoApplication {
	public static void main(String[] args) {
		SpringApplication.run(DemoApplication.class, args);
	}

}
@EnableAspectJAutoProxy 추가해주면 설정 끄~읕
이제 새로 추가된 exception, util에 대해서 먼저 설명하겠다.
exception > AuthException
package com.example.demo.exception;

public class AuthException extends RuntimeException {
    public AuthException(String message){
        super(message);
    }
}
exception > ErrorHandler
package com.example.demo.exception;

import org.springframework.http.HttpStatus;
import org.springframework.http.ResponseEntity;
import org.springframework.web.bind.annotation.ExceptionHandler;
import org.springframework.web.bind.annotation.RestController;
import org.springframework.web.bind.annotation.RestControllerAdvice;

@RestControllerAdvice(annotations = RestController.class)
public class ErrorHandler {
    @ExceptionHandler(AuthException.class)
    public ResponseEntity<String> authException(AuthException e){
        return ResponseEntity.status(HttpStatus.UNAUTHORIZED)
                .body(e.getMessage());
    }
}
해당 코드는 custom exception 부분으로 아래의 내용을 참고한다면 이해하기 쉬울 것이다!!
https://mjoo1106.tistory.com/entry/Spring-Exception-Custom
[Spring] Exception Custom
최근에 개발을 많이 놓아서 블로그에 Spring 관련 지식을 정리하지 못했다. 이제부터 다시 개발을 진행해보고자 한다. 이번에는 개발을 진행하면서 가장 중요한 부분인 Spring Exception 처리에 대해
mjoo1106.tistory.com
이제 중요한 AOP 설정에 대해서 소개하겠다.
util > User
package com.example.demo.util;

import java.lang.annotation.ElementType;
import java.lang.annotation.Retention;
import java.lang.annotation.RetentionPolicy;
import java.lang.annotation.Target;

@Target({ElementType.METHOD})
@Retention(RetentionPolicy.RUNTIME)
public @interface User {
}
해당 코드는 custom annotation을 작성한 것이다.
@Target({ElementType.METHOD})은 자바 컴파일러가 annotation이 어디에 적용될지 결정하기 위해 사용하는 것이다. ElementType.XXX로 메서드, 패키지, 타입 등으로 지정할 수 있다.
@Retention(RetentionPolicy.RUNTIME)은 annotation이 적용되고 유지되는 범위를 의마한다. RUNTIME으로 지정한 경우 JVM에 의해 계속해서 참조가 가능하다.
util > UserAspect
package com.example.demo.util;

import com.example.demo.exception.AuthException;
import org.aspectj.lang.JoinPoint;
import org.aspectj.lang.annotation.Aspect;
import org.aspectj.lang.annotation.Before;
import org.springframework.beans.factory.annotation.Value;
import org.springframework.stereotype.Component;

import javax.servlet.http.HttpServletRequest;

@Aspect
@Component
public class UserAspect {
    @Value("${token.test}")
    private String serverToken;
    private final HttpServletRequest servletRequest;
    public UserAspect(HttpServletRequest servletRequest){
        this.servletRequest=servletRequest;
    }
    @Before("@annotation(com.example.demo.util.User)")
    public void checkUser(JoinPoint joinPoint){
        if(!servletRequest.getHeader("Authorization").equals(serverToken)){
            throw new AuthException("인증에 실패했습니다.");
        }
    }

}
해당 코드를 해석해보자면 우선 Aspect class로 지정한 것을 확인할 수 있다. 그리고 아래에 @Before(~~~.User)라는 annotation이 등장하는데, 이는 Custom annotation인 User 전에 반드시 수행한다는 것이다. 해당 코드 내부에는 Header로 입력받은 Authorization과 serverToken인 "kingmj"와 비교 후 Custom Exception인 AuthException에 인증을 실패하였다는 메시지를 던져주고 있다.
마지막으로 controller와 service의 내용이 조금 변경되어야 한다.
controller > TestController
package com.example.demo.controller;

import com.example.demo.service.TestService;
import com.example.demo.util.User;
import org.springframework.http.HttpStatus;
import org.springframework.http.ResponseEntity;
import org.springframework.web.bind.annotation.GetMapping;
import org.springframework.web.bind.annotation.PostMapping;
import org.springframework.web.bind.annotation.RestController;

@RestController
public class TestController {
    private final TestService testService;
    public TestController(TestService testService){
        this.testService=testService;
    }
    @User
    @GetMapping("/community")
    public ResponseEntity<String> getPoster(){
        return ResponseEntity.status(HttpStatus.OK)
                .body(testService.getPoster());
    }
    @User
    @PostMapping("/community")
    public ResponseEntity<String> writePoster(){
        return ResponseEntity.status(HttpStatus.OK)
                .body(testService.writePoster());
    }

}
service > TestService
package com.example.demo.service;

import org.springframework.stereotype.Service;

@Service
public class TestService {
    public String getPoster(){
        return "get 요청에 성공했습니다.";
    }
    public String writePoster(){
        return "post 요청 성공";
    }
}
결과

결론
오늘은 AOP에 대해 공부한 내용을 블로그에 정리를 해보았다. 이전 실습들과 다르게 난이도가 급상승한 느낌이 있다. 그러나, 한번 작성해보면 바로 이해가 갈 것이라고 확신한다.
그리고 AOP 2%만 맛보기로 해놓고 너무 많은 내용을 담은 것이 아닌가? 라는 생각이 들 수도있지만 정말 기본 예제와 코드를 소개한 것이기 때문에 이렇게 내용이 많아도 2%가 맞다..😭
다음번에는 AOP하면 빼놓을 수 없는 트랜잭션(Transcation)에 대해 정리해보겠다!!
'SPRING' 카테고리의 다른 글
| [JAVA] stream을 활용해보자 (10) | 2023.07.14 |
|---|---|
| [Spring] CORS 쉽게 처리하기 (4) | 2023.02.22 |
| [Spring] @Setter vs @Builder (2) | 2023.02.20 |
| [Spring] Exception Custom (0) | 2023.02.13 |
| [Spring] Google Login API 사용하기 (14) | 2022.10.10 |